


materials:
1. tin cans w/ plastic resealable lid or plastic liter soda bottles
2. a wire hanger (like from the dry cleaners)
3. fabric scraps
4. scissors and an exacto knife
5. hair dryer (if using plastic water bottles)
6. can opener (if using tin cans)
7. plants (herbs work well for these, also tomatoes and some flowers)
8. duct tape
9. spray adhesive (optional)
10. drill (or a hammer and a nail will work – this is for making small holes)
11. potting soil
12. coffee filters or landscape fabric scraps
13. wire cutters and pliers
cost:
soil/plants: $10
duct tape: $5
containers: free, on hand
time:
2-3 hours
instructions:
for can planter:
1. peel labels off the can, then wash and dry the can thoroughly.
2. use a can opener to remove the bottom of the can.
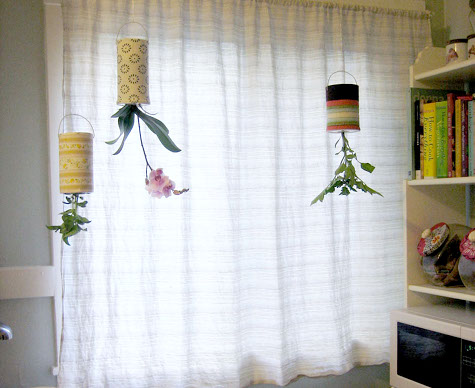
3. make holes in the disc that was the bottom of the can. you can use a drill with a tiny bit, or a hammer and nail. use the hammer to flatten any loose bits of metal that pop up from the holes, for safety. also make two holes in the sides of the can 1/4″ from the bottom, equidistant from each other, and on opposite sides of the can. these are for hanging the planter.
4. put your hand up through the tin can and hold the bottom inside it, and inch down from where it was originally attached. use duct tape to tape the bottom firmly in this position. when you are done taping, you will have a can with the bottom recessed an inch into the can and with little holes in it.5. flip the can over and put some soil in. place your plant in next and fill the can with soil around your plant. pack firmly so the soil is pretty tight, filling up to the top of the can.
6. trace the bottom of the can on a coffee filter or landscape fabric and cut out the circle. fold the circle in half, and cut a small hole in the center of the circle. this hole should be the diameter of your plants main stem. cut one slit in the circle from the outside to the hole in the center.
7. slide this circle around the plant stem and rest it on top of the can. this will prevent soil from spilling out when the planter is flipped over.
8. trace a circular object with an approximately 2″ diameter in the center of the plastic lid of the can. cut this circle out with an exacto knife.
9. gently maneuver your plant through this hole, sliding the plastic lid towards the rim of the can, pulling leaves gently through the hole. close the can tightly with the plastic lid. put a ring of duct tape around the top rim of the can, sealing the connection between the lid and the can.
10. cut a piece of fabric to wrap around the circumference of the can with 1/4″ overlap. make this piece of fabric 1/2 inch longer than the height of the can.
11. spray the inside of the fabric with spray adhesive and wrap it neatly around the planter, starting flush with the bottom of the planter (where the plant comes out), hiding all the duct tape. fold the extra 1/4″ of fabric over the top lip of the planter (which used to be the bottom) into the recessed portion, adding extra adhesive to keep it stuck down if necessary.
12. find the two hanger holes with your fingers and use a needle or a nail to poke through the fabric to reopen the holes. cut a 5″ piece of wire from the wire hanger and bend the two ends into small u-hooks. bend the wire into a “c” shape and hook the ends through the two hanger holes, creating a handle for hanging the planter.
for the bottle planter:
1. clean, wash, and dry the bottle.
2. use your exacto knife to cut the mouth of the bottle, leaving a hole with a 2-3″ diameter at the top of the bottle neck. also cut the bottom of the bottle off where the bottom of the label line would be. keep the bottom and throw out the bottle mouth and cap.
3. use your hairdryer to soften the plastic at the top of the bottle neck. with your hairdryer on high, wave it near the top of the bottle for a few seconds, until you see the plastic warping. then use your fingers (the plastic will be hot but not burning) to push the top of the bottle inward, inverting the conical part into the body of the bottle. the bottle should fold inward so that by pushing in the curved neck, you have created an even cylinder on the outside.4. use a drill or a hammer and nail to poke small holes in the bottom piece of the bottle, which you had just removed.
5. trace the bottom of the bottle on a coffee filter or landscape fabric and cut out the circle. cut a small hole in the center of the circle, the diameter of your plant stem, and cut a slit from outside to the center hole.
6. remove most of the surrounding soil from your plant, leaving only roots. place the filter around the stem of your plant (like your plan is wearing a bib). feed your plant gently from the opening in the bottom of the bottle through the hole in the top of the bottle.
7. now fill the planter through the bottom with soil, packing it tightly against the roots of the plant. fill it almost to the top, then tuck the bottom of the bottle back inside the planter, packing the soil in. put a ring of duct tape around the lip of the bottom and the bottle, so now the bottom is recessed into the planter. the inset lip of the top of the bottle allows water to drip down the sides, and not spill out the hole.
8. poke two small holes across from each other down 1/4″ from the top rim (by the top i mean the old bottom, because now the planter is upside down).
9. follow steps 10-12 from the can planter to cover your bottle planter with fabric and attach the hanger handle.
10. hang your planters somewhere with good light. the great thing is that they are easy to relocate if they are getting too much/too little sun.
YOU’RE DONE!!


0 comments:
Post a Comment